How to Turn a JPG Image into a DST Embroidery File (Step-by-Step Guide)
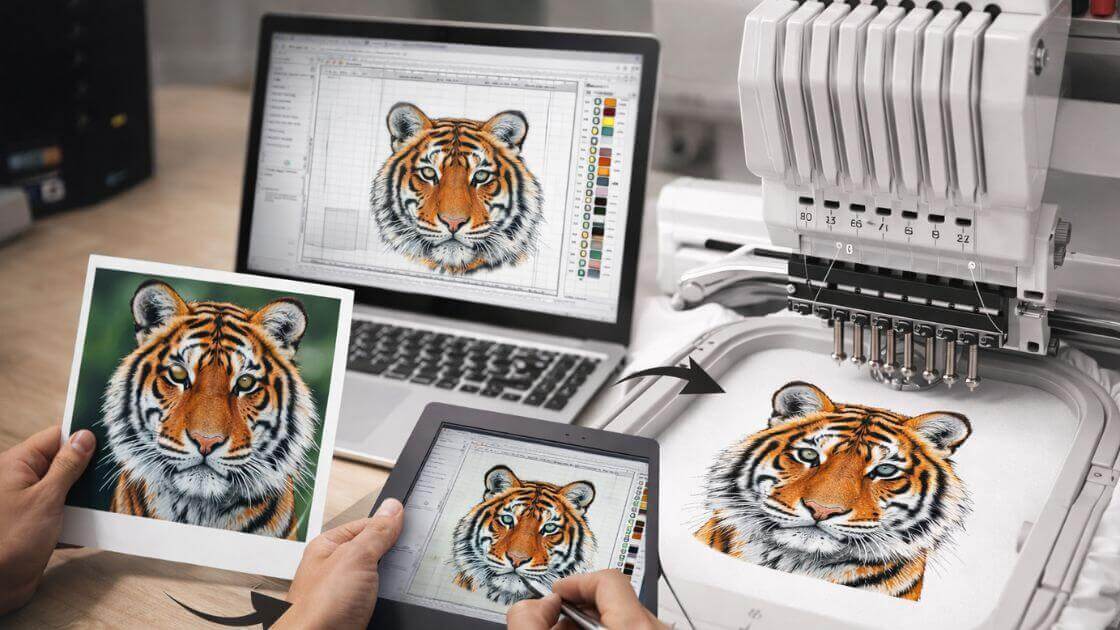
Embroidery is a great way to bring art to life on fabric. Many people start with a simple image. It can be a logo, a small icon, or a hand-drawn sketch saved as a JPG file. But embroidery machines cannot read image files. They need stitch files that tell the machine how to move the needle and thread.Because of this, many beginners search for ways to Convert JPG to DST so their designs can run on embroidery machines.
A DST file is a stitch format used by many industrial embroidery machines. It stores stitch paths, thread moves, and machine commands. Once the image is changed into this format, the machine can stitch the design on fabric.In this step-by-step guide, you will learn how to turn a JPG image into a DST embroidery file. The steps are simple. The language is easy. Even beginners can follow along and understand the process.
What Is a DST Embroidery File?
Before we start the process, it helps to understand what a DST file is.
A DST file is a stitch file used in embroidery machines. The format was first used with Tajima embroidery systems. Today, many machines support this format.
Key Features of DST Files
DST files contain stitch data instead of image data. They store information such as:
- Stitch location
- Stitch direction
- Jump stitches
- Trim commands
This data tells the embroidery machine how to create the design on fabric.
Why DST Files Are Popular
DST is one of the most common embroidery formats in the industry. Many embroidery shops use machines that support this format.
Because of this wide use, many designers convert their artwork into DST files.
Why JPG Images Cannot Work on Embroidery Machines
A JPG image may look clear on a screen. But an embroidery machine cannot read it.
Image Files Use Pixels
A JPG image is made of pixels. Each pixel is a small dot of color. Many dots come together to form the picture.
Computers understand pixels well. But embroidery machines do not.
Embroidery Machines Need Stitch Paths
Embroidery machines move the needle in a path. They follow stitch commands.
This means the design must be changed into stitch instructions before the machine can use it.
Tools You Need Before Starting
To change a JPG image into a DST file, you need the right tools.
Embroidery Digitizing Software
Digitizing software helps turn images into stitch designs. It allows you to trace shapes and create stitch paths.
Common features in digitizing software include:
- Image import
- Stitch type selection
- Stitch density control
- Thread color settings
A Clear JPG Image
A clean image makes the process easier. Use a high-quality image with clear shapes and strong lines.
Blurry or messy images can create problems during digitizing.
Basic Knowledge of Stitch Types
It also helps to know common stitch types used in embroidery.
Some basic stitches include:
- Satin stitch
- Fill stitch
- Running stitch
These stitches are used to create different parts of the design.
Step-by-Step Guide to Turn a JPG into a DST File
Now we will walk through the process step by step.
Step 1: Choose a Simple JPG Design
Start with a simple design.
Logos and icons work well. Avoid designs with too many small details.
Small shapes and thin lines can be hard for embroidery machines to stitch.
Tips for Choosing the Right Image
- Use clear lines
- Avoid tiny text
- Keep colors simple
- Choose bold shapes
A simple design always gives better embroidery results.
Step 2: Clean the Image Before Digitizing
Before you start digitizing, clean the image.
You can use a graphic design program to improve the artwork.
Image Cleaning Steps
- Remove extra background space
- Adjust brightness and contrast
- Sharpen lines if needed
- Reduce too many colors
This step helps the digitizing process run smoothly.
Step 3: Import the JPG into Digitizing Software
Open your embroidery digitizing software.
Then import the JPG image.
The image will appear on the design workspace. You will use it as a guide for tracing.
This step is very important. The software does not turn the image into stitches yet. It only loads the image so you can digitize it.
Step 4: Trace the Design Manually
Now the real digitizing work begins.
You will trace the shapes in the image using digitizing tools.
Why Manual Tracing Works Better
Manual tracing gives more control. It helps you choose stitch types and directions.
Automatic conversion tools exist, but they often create messy stitch paths.
Manual digitizing creates cleaner results.
Steps for Tracing
- Select a shape tool in the software
- Trace the first shape in the design
- Choose the stitch type
- Set stitch direction
- Adjust stitch density
Repeat these steps until the whole design is digitized.
Step 5: Assign Stitch Types to Each Area
Different parts of the design need different stitch styles.
Common Stitch Types
Satin Stitch
Satin stitch works best for letters and borders.
It creates smooth and shiny thread lines.
Fill Stitch
Fill stitch covers larger areas.
It fills shapes with rows of stitches.
Running Stitch
Running stitch works well for outlines and small details.
Choose the stitch type based on the design shape.
Step 6: Set Stitch Direction and Density
Stitch direction controls how the thread flows across the design.
Changing the stitch direction can improve the look of the design.
Stitch Density
Density controls how close stitches are placed.
- High density means more stitches
- Low density means fewer stitches
Too many stitches can make the fabric stiff. Too few stitches can create gaps.
Finding the right balance is important.
Step 7: Add Underlay Stitches
Underlay stitches go under the top stitches.
They help hold the fabric in place and support the main design.
Types of Underlay
Common underlay styles include:
- Edge run
- Zigzag underlay
- Center run
Underlay helps prevent fabric shifting during embroidery.
Step 8: Check the Stitch Path
Before saving the design, check the stitch order.
Good stitch order helps the machine run smoothly.
Why Stitch Order Matters
A poor stitch path can cause:
- Thread breaks
- Fabric puckering
- Extra trims
Try to stitch from the center of the design outward.
This helps keep the fabric stable.
Step 9: Run a Stitch Simulation
Most digitizing software includes a stitch simulation feature.
This tool shows how the machine will stitch the design.
What to Look for During Simulation
Watch the design carefully.
Check for:
- Unwanted jumps
- Long stitches
- Thread overlaps
Fix any problems before saving the final file.
Step 10: Export the Design as a DST File
Now the design is ready to save.
Choose the export option in the software.
Select DST as the file format.
The program will generate the embroidery stitch file.
This file can now be loaded into an embroidery machine.
Testing the DST File on Fabric
Never start a big project without testing the design first.
Run a Test Stitch
Load the DST file into your embroidery machine.
Use scrap fabric for testing.
This helps you check the stitch quality.
Check the Final Result
Look for issues such as:
- Thread breaks
- Gaps in stitching
- Uneven shapes
If needed, go back to the software and adjust the design.
Testing helps avoid wasted fabric and thread.
Common Mistakes Beginners Make
Many beginners face the same problems when converting images into embroidery files.
Using Low-Quality Images
Poor images lead to poor embroidery designs.
Always start with clear artwork.
Too Many Details
Embroidery machines cannot stitch tiny details well.
Simplify the design when possible.
Ignoring Fabric Type
Different fabrics behave in different ways.
Stretch fabric may need different stitch settings than cotton.
Helpful Tips for Better Embroidery Results
Small tips can make a big difference in embroidery quality.
Keep Designs Simple
Simple designs stitch faster and look cleaner.
Use Fewer Thread Colors
Too many color changes slow down production.
Always Test Designs
A test stitch helps you find errors before final stitching.
Use the Right Stabilizer
Stabilizer keeps the fabric steady during embroidery.
Choose the stabilizer based on the fabric type.
How Practice Improves Digitizing Skills
Embroidery digitizing is a skill that improves with practice.
Start with small and simple designs. Over time, you will learn how stitches behave on fabric.
Watching test stitches is one of the best ways to learn.
Each project teaches something new.
Final Thoughts
Turning a JPG image into a DST embroidery file may look hard at first. But the process becomes easier once you understand the steps.
Start with a clean image. Prepare the design well. Trace the artwork carefully. Choose the right stitch types. Then test the design before final production.
With practice and patience, you can create clean embroidery designs from simple images.
Embroidery is both creative and technical. When these two skills work together, the result is a beautiful stitched design that stands out on any fabric.